

If you missed that post, you can read it here: Save Time On Social Media With Twittimer.
(Note: This post was originally published on Writing Hacks, my free newsletter for working writers. If you'd like articles like this as soon as they are published, subscribe to Writing Hacks: Tips about the Art, Craft, and Business of Writing to make life easier for writers.)
Twittimer is very easy to use. You can schedule a few tweets in advance or upload a CSV file with hundreds of tweets. That's what today's post is about: How to Upload a Spreadsheet to Twittimer.
I'll also tell you how to get an image added to those tweets you upload. So let's get started.
1. Register for a Twittimer account. They offer a free account, but to utilize the website to the max, sign up for a paid account at the lowest level. For 6 months, it costs a little more than $20.00.
2. Set up your Social Media Accounts. List your FB, Twitter, and Linked In accounts and grant permission for Twittimer to use them. If you have 2 Twitter accounts, one will be listed as TW1 and the other TW2. The same for FB. One will be FB1, etc.
3. Open Microsoft Excel because you'll be creating a .CSV file. (I believe you can also use the Open Office version as well as the Corel version.)
4. Don't post the same message within 24 hours of another identical one. Also don't post the same message day after day. There must be some variation in the text or Twitter considers them spam, and may ban your account. Twittimer will do the same.

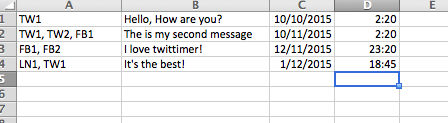
5. Here's the format for a .CSV file that can be successfully uploaded to Twittimer.
The .CSV will have 4 columns.
Column 1: List the Social Media Account you want the text to post to. Use the code assigned to your accounts, i.e., TW1, TW2, FB1, etc.
Column 2: This is where you type your message. IMPORTANT: Do not use any special characters or punctuation other than comma, period, or question mark. If you use other characters, the post will publish with a little black triangle and question mark where the character should be. If you don't mind going back and editing each post once it's uploaded to Twittimer, you can ignore this caution and plan on fixing each instance, but I think it's easier just to do it right the first time.
Column 3: This is the date you want your message to post written in this formula -- MM/DD/YYYY.
Column 4: This is the time you want your post to publish in 24 Hour format, so 6:00pm would be 18:00. Thirty minutes after midnight, or 12:30am, would be 00:30, and 30 minutes after noon, or 12:30pm, would be 12:30pm.
Here's a picture of a sample .CSV file taken from Twittimer's Help page.
6. Remember, you can NOT upload Images using a .CSV bulk uploader.
7. Once you have your file completed, proofread it. If you think it's ready to go, save it as a .CSV (not Excel) with a file name you'll readily recognize.
8. Sign in to Twittimer. One the left Menu, scroll down to CSV Upload. Browse for the file and click to upload it.
9. It only takes a minute or so to upload the spreadsheet. If there are any errors on the spreadsheet, you'll get a notice.
Editing a Tweet After Uploading
Once the .CSV file is uploaded, you can edit any way you want. You can edit to add an image to post with the message. Here's how:
1. Click the gear icon in upper right of each message. That opens the Edit selections.
2. Click Edit / click Add Image / browse for your image. Select and open it to upload as you would any image file. Once it's uploaded, click the orange EDIT button in lower right of the box to save the edited message.

Another Twittimer Benefit
Once you have a month's file set up, you can just go in and change the dates and times to publish all of them again the next month.
Takeaway Truth
That's it! I hope you'll start using Twittimer. It's really a great tool for busy authors.
If you're a writer, you might want to subscribe to WritingHacks, my free newsletter with tips to make your writing life easier.
Hi Joan
ReplyDeleteGreat blog post! Wondering how you add your shortened url links to this spreadsheet?? Any ideas?
Thanks! There are no restrictions on monetized or personalized links. Just use the bitly link with your text. Make sure it's less than 140 characters if for twitter.
Delete